INTRODUCTION
Welcome to Scrimmage, where daring heists, showdowns at noon, jungle treks for treasure, secret missions, and epic samurai battles are just the start. This game lets you bring any adventure you can think of to life on your tabletop. You've got everything you need right here to get started and plenty for the gamemasters to craft their own thrilling tales.What makes Scrimmage stand out? It's all about the story. Sure, you'll have clashes and confrontations, but winning isn't just about fighting. We push you to think differently, get creative, and find smart ways to reach your objectives. This isn't a game stuck in one kind of story. Whether you're into ancient mysteries, wild west standoffs, jungle expeditions, war-time raids, or samurai honour, Scrimmage is your go-to. Think of this game as your ultimate adventure kit, ready to turn your wildest scenarios into reality.
DESIGN PRINCIPLES
When we started writing these rules, we had a few key principles in mind to ensure that your adventures stay thrilling, immersive, and straightforward.- Streamlined Play: We've ditched complex modifiers. Why? Because we don't want you bogged down by endless math. Games should flow, not stall.
- Clear Battlegrounds: You won't see the field cluttered with counters or tokens. We keep the focus on the story, not on tracking tiny details that distract you from the big picture.
- Story Over Sword: Sure, there's combat. But Scrimmage is more than just battles. We're here for the narrative, for the drama, adventure, and moments that make stories worth telling.
BASIC RULES
Welcome to your first steps in the world of Scrimmage! This section is your starting line. We'll cover what you need to kick off and give you a basic run-through of how things go down. As we move forward, we'll dive deeper into gameplay specifics.BEFORE YOU PLAY
Measuring: We measure everything in inches, edge to edge from a model’s base. You're allowed to measure distances at any time before taking your Action, meaning strategy is key – measure twice, move once!Range Bands: In Scrimmage we use the following 5 range bands:
- Melee: Base contact
- Short: up to 6"
- Medium: up to 12"
- Long: up to 24"
- Extreme: 24" or more
Choosing Your Champions: This game is optimized for 28mm scale miniatures, standing on 25mm or 30mm bases. You can go smaller, with 20mm models, without tweaking the rules. But if you venture beyond – larger than 28mm or tinier than 20mm – you’ll need to adjust distances (double for larger, halve for smaller). This includes your table size!
Eyes on the Prize: Your models see everything, 360° around, unless something blocks their view like terrain or other figures. If your model can’t see an opponent, they can’t engage them – unless, of course, special abilities or scenarios say otherwise.
ROLLING THE DICE
In Scrimmage, your fate often hangs on the roll of a die. Here’s how it works:Dice Types: The game uses various dice: D4, D6, D8, D10, D12, and D20. The type you roll depends on the situation or the characteristic of the model (see below).
Perfect Rolls and Exploding Dice: When you roll the highest number possible on your die, that's a Perfect Roll. But it doesn't stop there – a Perfect Roll triggers what we call Exploding Dice. This means you get to roll that die again and add the new roll to your total. It’s a chance for heroic feats and unexpected turns of events.
Advantage and Disadvantage: Sometimes, you’ll find yourself in situations where you have an edge (Advantage) or face greater challenges (Disadvantage). When you roll with Advantage, you throw two dice of the needed type and choose the higher result, tipping fate in your favour. On the flip side, rolling with Disadvantage means you must use the lower of the two rolls, reflecting the tough spot your character is in.
Under Disadvantage, your warrior, wounded and weary, faces a seasoned duellist. The clash is imminent. You roll two D8s for the attack, getting an 8 and a 3. With a heavy heart, you take the 3, as your warrior's strike falters under the pain and fatigue.
CHARACTER STATISTICS
Every model on the battlefield is defined by six key statistics. Think of these stats as the DNA of your character, shaping their abilities, behaviours, and physical traits. The stats range from D4, indicating a weaker or less developed attribute, to D20, representing peak excellence.- Power: This measures raw physical strength and the ability to wield it. A character with a high Power stat can deliver devastating blows and handle heavier weapons or equipment with ease.
- Agility: Agility reflects a character's speed, dexterity, and overall coordination. High Agility means a character can move swiftly, dodge attacks, and perform intricate tasks or manoeuvres under pressure.
- Vitality: Vitality is all about endurance and health. A robust Vitality score means a character can withstand injuries, endure harsh conditions, and recover from wounds more swiftly.
- Perception: This stat represents a character’s awareness and intuition. With keen Perception, a character notices hidden dangers, discerns lies, and often acts first in situations where being alert makes all the difference.
- Knowledge: Knowledge encompasses intelligence, wisdom, and the depth of understanding a character has about the world. It affects their ability to strategize, recall information, and solve complex problems.
- Charisma: Finally, Charisma measures a character's mental fortitude, emotional strength and social interactions. High Charisma allows a character to resist psychological manipulation, endure mental strain, and persuade others to their point of view.
INITIATIVE
Every turn starts with establishing who gets to act first, setting the stage for the action to unfold. This is determined by the Initiative Order. Here, the leader of each team rolls their Perception die. The higher the roll, the earlier the team acts. This sequence, from the highest roll to the lowest, dictates the flow of the turn.ACTIONS
Once the order is set, the active player springs into action. In each turn, you can activate one of your models that hasn't moved yet. This model can then perform one Action, a decision that could change the course of the skirmish. Here are the choices:These Actions, described in more detail below, are the heart of your strategy, guiding you to carve your path to victory.
MOVEMENT
In Scrimmage, movement is part of your actions, rather than being a standalone choice. This approach allows for fluid and narrative-driven gameplay, where every decision is part of a larger story unfolding on your battlefield.Movement is intrinsic to various actions your models undertake. Whether they're charging into battle, scouting ahead, or retreating to regroup, movement is always 6". Some special abilities may allow a model to move more than 6".
The land itself plays a crucial role in your strategy. On Open Ground, your models move their full 6" unimpededly. However, Difficult Terrain, such as dense underbrush, ruins, or steep inclines, challenges their progress, halving their move distance. This natural obstacle forces you to think creatively and adapt your tactics to the environment.
- Jump Over/Across
- Climb
- Fall
THE SPRINT ACTION
When a model sprints, it's not just moving; it's dashing across the battlefield with double the determination and speed. This action allows your model to cover ground at twice its normal move rate, propelling it into crucial positions or away from imminent threats.The Sprint is your go-to when distance is your enemy or when seizing the moment could turn the tide of battle. Whether you're closing in for a decisive strike or retreating to a safer vantage point, the Sprint injects a burst of adrenaline into your strategy.
THE SHOOT ACTION
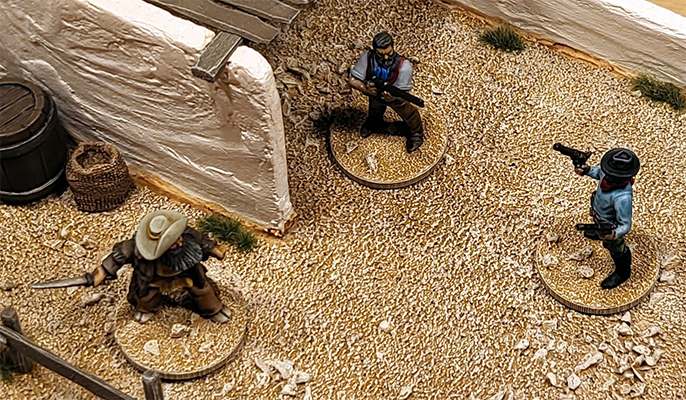
The Shoot action combines the precision of a well-aimed ranged attack with the option for tactical movement. This action allows a model to reposition before unleashing a ranged attack against an adversary, melding strategy with the thrill of combat.When a model decides to Shoot, the encounter becomes a test of perception and agility. The attacker, relying on their keen senses, rolls their Perception die, while the defender's quick reflexes are represented by an Agility die roll. The outcome hinges on these rolls: if the attacker's result is equal to or surpasses the defender's, the shot finds its mark, and damage is dealt according to the weapon's capabilities.
However, this interaction isn't just about hitting or missing. Certain conditions can sway the encounter further. Choosing not to move grants the attacker an Advantage, sharpening their focus on the target. Yet, challenges like a partially obscured target or an opponent's recent sprint introduce a Disadvantage, reflecting the difficulty of landing a precise shot under less-than-ideal circumstances.
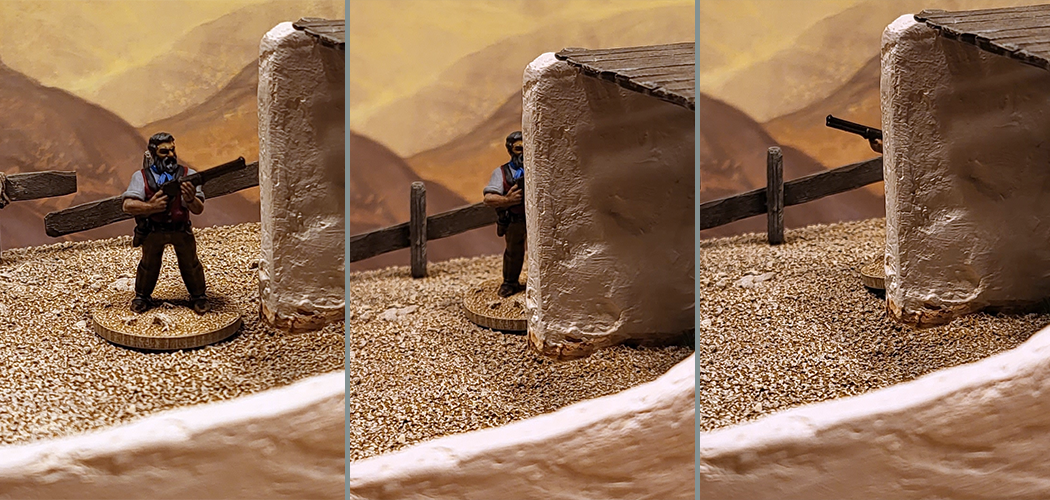
Cowboy Ronnie above shows us how cover works; on the left, he is in full view, in the middle he is partially obscured (Disadvantage), and on the right only the barrel of his gun is visible and therefore he is impossible to target.
The adrenaline of combat plays its part too. Successful attacks fuel the attacker's momentum, an effect explained further down the line.
THE FIGHT ACTION
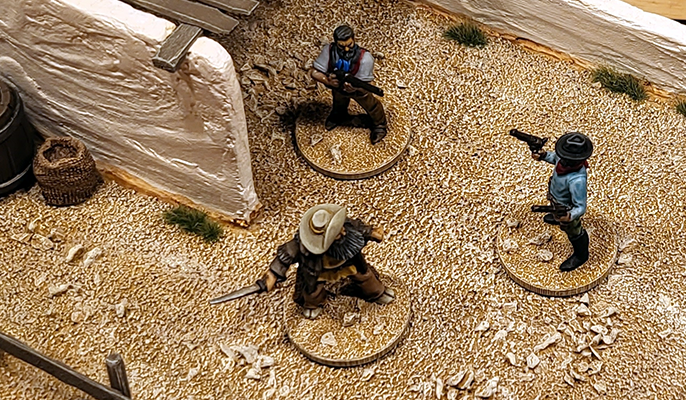
The Fight action captures the raw intensity of melee combat, allowing for a blend of movement and close-quarters battle. This action embodies the moment when a model charges into melee, weapon drawn and eyes aflame with the fervour of battle.A Fight is not just a contest of strength; it is a ballet of force and endurance. The attacking model, channelling their might, rolls their Power die, while the defender counters with the resilience of their Vitality die. The clash is straightforward yet profound: if the attacker's roll matches or exceeds that of the defender, the attack lands, carving into the enemy and causing wounds as dictated by the wielded weapon's damage.
The dynamics of a melee brawl offer additional layers to consider. Charging beyond 3 inches to engage gives the attacker Advantage, representing the momentum and surprise of their assault. Conversely, a defender finds themselves increasingly beleaguered if encircled by multiple foes; for each enemy beyond the first in base contact, they suffer a reduction in their Vitality die type, though never dropping below the humble D4.
Once locked in melee, it is quite difficult to escape but not impossible. A player can choose to disengage after a successful Fight action instead of doing damage. If this option is chosen, the model can make a full Move away from the melee in a direction of their choosing.
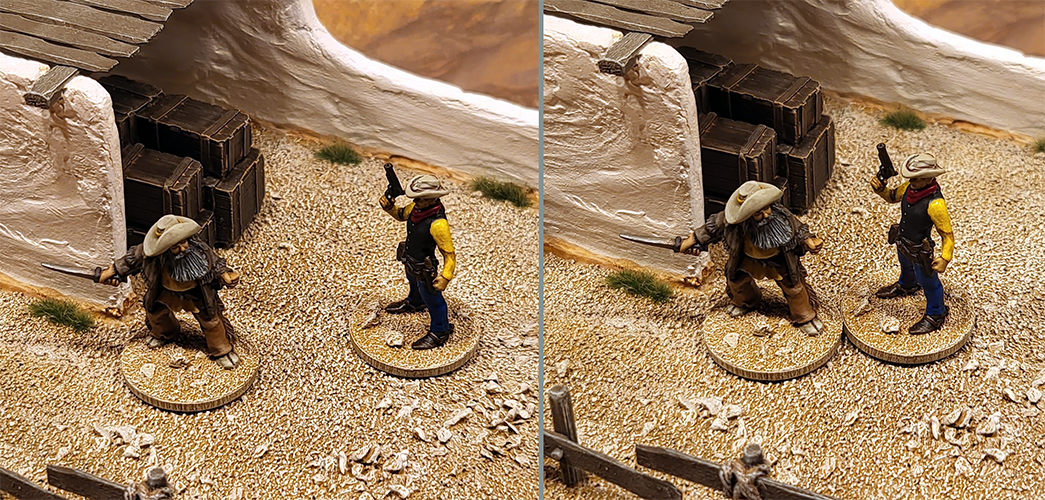
Cowboy Luke is in the midst of an altercation with a rather smelly mountain man. Only in the right picture can they actually exchange blows as they are in base contact (melee range). In the picture on the left they are not in base contact and thus cannot Fight. However, if either of the combatants has a melee weapon with Reach they could in fact Fight, provided that they are no more than 1" away from each other.
This is where adrenaline kicks in, turning successful strikes into a surge of energy for the attacker, a mechanic we'll explore in further detail.
THE INVESTIGATE ACTION
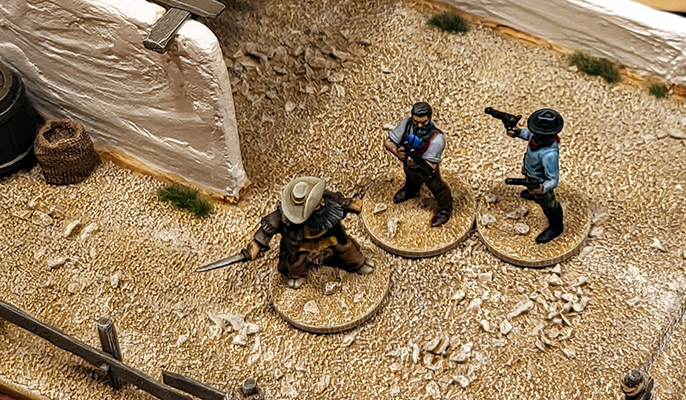
The Investigate lets your models uncover vital information, expose hidden dangers, or discover critical resources. It allows a model to first move, positioning themselves optimally on the battlefield, and then engage in the detailed scrutiny of their surroundings or a specific target.For objects or specific areas marked as enigmas, a Difficulty Threshold (DT) is set by the scenario, a static number that represents the obscurity and complexity of what lies to be discovered. If the result is equal or higher than the DT, the Investigation is successful.
However, when the subject of investigation is another model, perhaps an enemy lurking with ill intent, the process becomes an opposed roll. The investigator's Perception rolls against the Agility of the opposing model. If the investigator’s result is equal or higher than the opposing model’s Agility, the roll is successful.
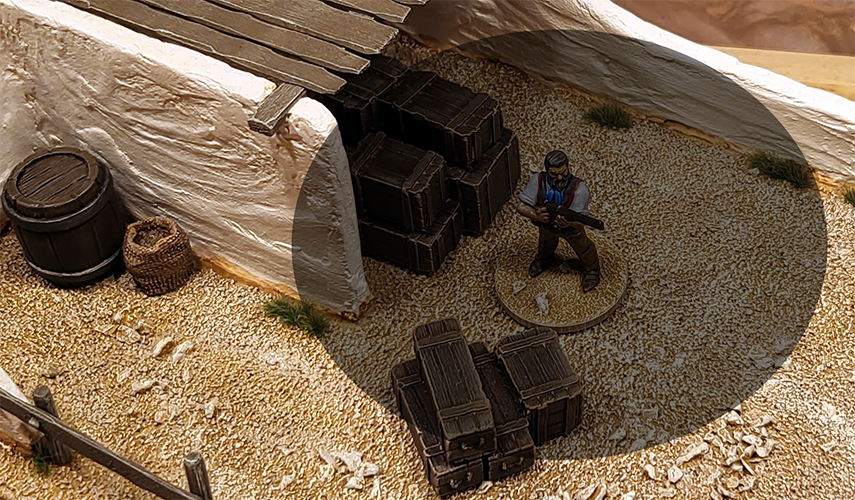
Cowboy Ronnie above is Investigating the shaded area (3" all around). As an Action he manages to Investigate the two stacks of crates. The sack and barrel on the far left are too far away and a direct Line of Sight is blocked by the wall and thus cannot be Investigated during this Action.
Whether it’s the hidden switch in an ancient ruin, the faint trail left by an enemy, or the whispered rumours in a crowded tavern, the Investigate action is your key to unlocking the world's mysteries. Success can yield invaluable information, crucial items, or pivotal advantages.
THE INTERACT ACTION
The Interact action allows your models to engage directly with the world around them, be it through conversations with non-player characters (NPCs) or manipulation of objects integral to their quest.This action is a two-step process: first, the model may move, positioning themselves to engage with their target, be it an NPC or an object. Then, they attempt the interaction itself. The nature of the interaction dictates the type of roll required: engaging with an NPC challenges the model's Charisma, testing their ability to handle social or psychological pressures. Meanwhile, manipulating an object, such as pulling a lever or opening a trapped chest, calls upon the model's Agility, demanding precision and dexterity. In order to perform an Interact action, the model must be in base contact with the object or within 3” of the NPC. Please note that Interacting with an NPC and there is no direct Line of Sight, the roll has Disadvantage.
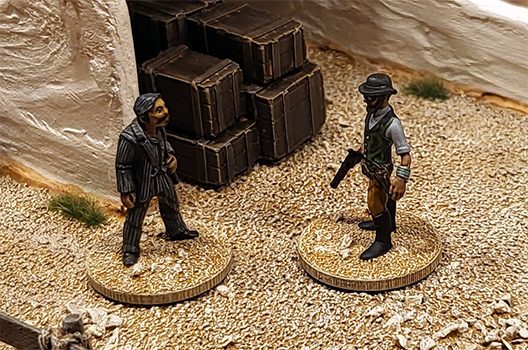
Cowboy Lenny is having an interesting conversation with a notorious saloon owner, a true gem of a man. Interacting with an NPC can be done from 3" away.
The scenario sets the Difficulty Threshold (DT) for these interactions, reflecting the complexity or resistance faced during the attempt. It's important to note, Moving before an interaction introduces a layer of challenge, potentially imposing a Disadvantage on the roll, symbolizing the difficulty of performing precise actions under pressure or after exertion.
In a dimly lit chamber, your envoy approaches the tribal chief, a figure crucial to your mission's success. With careful words and steady eye contact, they attempt to sway his allegiance. The roll of Charisma against the chief's imposing DT reflects a tense negotiation, with every moment hanging in the balance.
The Interact action in Scrimmage adds depth to the gameplay, offering more than mere combat. It invites players to think, to plan, and to engage with the game's narrative in a manner that tests both their characters' strengths and their own strategic acumen.
THE OVERWATCH ACTION
This action is all about anticipation and strategic positioning. When you choose to go on Overwatch, your model holds their ground instead of acting during their turn. They wait, eyes on the horizon, ready to spring into action.Here's how it works: Your model doesn't move or act on their turn. Instead, they prepare to disrupt the enemy's plans. If an enemy model wanders into your model's Zone of Influence — that's the space within reach of a single move or the range of their ranged weapon — your model can instantly react. They can either launch into a Fight if the enemy is close enough or take a Shoot action if the foe is at a distance, effectively interrupting the enemy's action.
Here we see Cowboy Ronnie on Overwatch, Cowboy Andy twiddling his thumbs and Stinky Pete preparing to stab Cowboy Andy with this knife.
 |  |
THE BREATHE ACTION
The Breathe action serves as a moment of respite and recovery; a model can choose to pause, focus, and regain their composure.Choosing the Breathe action means the model does not move; they stand their ground, drawing deep, steadying breaths. They roll their Vitality die, the result reflecting their ability to calm their nerves and shake off the fog of adrenaline. The number rolled is the amount of Adrenaline points they manage to shed and/or the Health Points they recuperate, helping them stave off being overwhelmed by the heat of battle. In addition, they can crawl away 3".
HEALTH AND ADRENALINE
In the game, every character starts with a balance of strength and stamina, represented by 7 health points and 7 adrenaline points. These points are vital to your model's survival and effectiveness on the battlefield.Health Points and Combat: Health points measure your model's ability to withstand damage. During battle, if your model is hit by attacks from weapons or faces other dangers, they lose health points. The impact depends on the weapon or hazard encountered. A significant injury occurs when a model loses its fourth health point; this injury weakens them, reducing their dice rolls by one step (for example, a D8 becomes a D6). The situation worsens if they lose their sixth health point, where their dice are reduced again but will not fall below a D4. If a model's health points are depleted, they become unconscious, laid on their side on the battlefield, the only available action to them is the Breathe. Models that go down in combat are no longer considered engaged in melee.
Damage: In Scrimmage we use the following 4 types of damage:
Adrenaline: Adrenaline is a reflection of your model's fight-or-flight response, a crucial element in Scrimmage. It increases under various conditions: being targeted by gunfire, sprinting across the field, landing successful attacks, achieving objectives, and the longer a skirmish goes on. While adrenaline can fuel special abilities tied to your model's Archetype, a surge of this intense energy can also be overwhelming. Accumulating too much adrenaline can render a model catatonic, overwhelmed by the chaos of combat.
In short, the following situations generate Adrenaline:
ADVANCED RULES
...TEAMBUILDING
...Archetypes
See below for an overview of all available Archetypes (at this point).| Archetypes | ||||
|---|---|---|---|---|
| The Adventurer | Bold and daring, Adventurers live for the thrill of discovery and the heat of battle. They are versatile and resourceful, capable of facing any challenge with courage and a smile. | |||
| The Bodyguard | Loyal and protective, Bodyguards are dedicated to safeguarding their charges, no matter the cost. Their commitment and defensive skills ensure that their protectee can trust in their unwavering support. | |||
| The Brute | Towering and powerful, Brutes are the epitome of raw strength and intimidation. Their sheer physical presence and power can change the course of a battle with just a few blows. | |||
| The Diplomat | Charismatic and persuasive, Diplomats excel in negotiation and conflict resolution, turning potential foes into allies. They are crucial in scenarios where words are as powerful as weapons. | |||
| The Explorer | Adventurous and resilient, Explorers thrive in unknown environments, always eager to discover new areas and solve mysteries. Their knack for survival and exploration makes them essential in unfamiliar terrains. | |||
| The Face | Charming and deceptive, Faces excel in manipulation and social engineering, turning enemy agents and bypassing conflicts with ease. They are masters of disguise and persuasion, navigating social situations to their advantage. | |||
| The Gunner | Armed to the teeth and always ready for a fight, Gunners provide heavy firepower and suppression, dominating the battlefield with their arsenal. Their presence is enough to intimidate and control enemy movement. | |||
| The Healer | The backbone of any group, Healers provide essential support, restoring health and curing ailments. Their ability to keep teammates in the fight can turn the tide of any skirmish. | |||
| The Hunter | Patient and relentless, Hunters excel in tracking and taking down elusive targets. Their expertise in traps and tracking makes them the bane of any who would attempt to hide or flee. | |||
| The Marksman | Precision personified, Marksmen can take down targets from great distances with their unmatched ranged capabilities. Their ability to eliminate key targets can significantly weaken the enemy's resolve. | |||
| The Martial Artist | Disciplined and focused, Martial Artists master close combat with unparalleled grace and efficiency. Their understanding of balance, power, and movement makes them deadly in hand-to-hand encounters. | |||
| The Mentor | Experienced and wise, Mentors guide their allies, enhancing their abilities and providing valuable advice. Their presence on the field can elevate the performance of the entire team. | |||
| The Mercenary | Professional and detached, Mercenaries are hired soldiers who bring expertise and experience to any conflict. Their loyalty may be bought, but their skill and efficiency in combat are beyond question. | |||
| The Outlaw | Living outside the law, Outlaws are survivalists and fighters who don’t shy away from using dirty tricks and tactics. Their rough-and-tumble approach is unpredictable, making them dangerous foes and valuable allies. | |||
| The Rebel | Defiant and resourceful, Rebels fight against the odds, using unconventional tactics to undermine their adversaries. They are driven by a cause, making them passionate and unpredictable on the battlefield. | |||
| The Shadow | Masters of stealth and surprise attacks, Shadows can move unseen and strike where the enemy least expects. They thrive in chaos, using their skills to disrupt enemy lines and escape without a trace. | |||
| The Spy | Elusive and secretive, Spies excel in gathering intelligence and executing covert operations. Their skills in espionage and sabotage can unravel enemy plans and turn the tide of battle without a shot being fired. | |||
| The Tactician | Intelligent and calculating, Tacticians view the battlefield as a chessboard, always two steps ahead of the enemy. Their strategic planning and foresight can dismantle even the most formidable opponents. | |||
| The Trickster | Devious and unpredictable, Tricksters use cunning and trickery to confuse and disorient their enemies. They excel in creating diversions and manipulating the battlefield to their advantage. | |||
| The Vanguard | The frontline protector, Vanguards are durable fighters who lead charges and defend their comrades. Their presence bolsters the resolve of their team, making them indispensable in holding the line against enemy advances. | |||
| The Warrior | Strong and honorable, Warriors excel in combat, inspiring their allies with their bravery and skill. Their prowess in battle is unmatched, making them the cornerstone of any offensive. | |||
| The Adventurer | 24 pts | |||
|---|---|---|---|---|
| Passive: | Quick Reflexes | Can reroll one failed Agility or Vitality die once per turn. | ||
| Active: | 2  |
Thrill of Discovery | Successfully pass an Investigate Action. | |
| Active: | 4 |
Gambit | Take two Actions in one activation, but has Disadvantage on all rolls for these Actions. | |
| Die Change: | +1 Perception | |||
| Examples: | Bilbo Baggins (The Lord of the Rings), Link (Zelda), Allan Quatermain | |||
| The Bodyguard | 32 pts | |||
|---|---|---|---|---|
| Passive: | Protector's Oath | Automatically takes hits meant for friendly models in base contact, if the Bodyguard has higher Vitality. | ||
| Active: | 4 |
Emergency Extraction | Move both the Bodyguard and one friendly model within 3", ignoring Difficult Terrain and/or melee. | |
| Active: | 4 |
Shield Wall | Provides full Cover for one model in base contact. Can Move first. | |
| Die Change: | +1 Vitality | |||
| Examples: | Frank Martin (The Transporter), Brienne of Tarth (Game of Thrones), Groot (Marvel) | |||
| The Brute | 30 pts | |||
|---|---|---|---|---|
| Passive: | Intimidating Presence | Enemies that target The Brute with a Fight Action have their Power die downgraded one step. | ||
| Active: | 3 |
Smash | This Fight Action upgrades damage one step. Once the Fight action is resolved, the enemy model is pushed 3" away from the Brute. | |
| Active: | 5 |
Bulldoze | Full move in a straight line, any enemy models encountered receive Average damage and are moved 2" out of the way. | |
| Die Change: | +1 Power | |||
| Examples: | Bane (DC), The Mountain (Game of Thrones), Bowser (Super Mario) | |||
| The Diplomat | 26 pts | |||
|---|---|---|---|---|
| Passive: | Peacekeeper | Friendly models within 3" cannot be the target of Fight actions. | ||
| Active: | 3 |
Charm | One enemy model within 3" of the Diplomat is controlled by the Diplomat's player during its next activation if it fails a Charisma Roll-Off. May Move first. | |
| Active: | 3 |
Ceasefire | One enemy model within 12" of the Diplomat cannot take the Shoot Action during its next activation if it fails a Charisma Roll-Off. May Move first. | |
| Die Change: | +1 Charisma | |||
| Examples: | Jean-Luc Picard (Star Trek), Daenerys Targaryen (Game of Thrones), Black Panther (Marvel) | |||
| The Explorer | 24 pts | |||
|---|---|---|---|---|
| Passive: | Trailblazer | Allies within 3" do not suffer penalties for Difficult Terrain. | ||
| Active: | 4 |
Survival Instinct | Either a friendly model in base contact or the Explorer itself heals 2 Health Points. May Move first. | |
| Active: | 4 |
Tomb Raider | Disable a single trap within 3" of the Explorer. May Move first. | |
| Die Change: | +1 Knowledge | |||
| Examples: | Nathan Drake (Uncharted), Indiana Jones, Rick O'Connell (The Mummy) | |||
| The Face | 28 pts | |||
|---|---|---|---|---|
| Passive: | Silver Tongue | The Face has Advantage on Charisma rolls when Interacting or Investigating NPCs and enemy models. | ||
| Active: | 3 |
Misdirect | If this Interact Action is successful, target model within 3" is immediately Moved in a direction of the Face's choosing. | |
| Active: | 4 |
Negotiate | Friendly and enemy models engaged in a melee within 3" of the Face are moved apart 2", these models are no longer engaged in combat. | |
| Die Change: | +1 Charisma | |||
| Examples: | James Bond, Don Draper (Mad Men), Tyrion Lannister (Game of Thrones) | |||
| The Gunner | 28 pts | |||
|---|---|---|---|---|
| Passive: | Suppressive Fire | Enemy models halve their next Move after being wounded by the Gunner’s Shoot action. | ||
| Active: | 5 |
Rapid Fire | This Shoot action hits up to three enemy models within 3" of each other. | |
| Active: | 3 |
Covering Fire | One friendly model in Line of Sight of the Gunner can Move without triggering enemy Intercept actions. | |
| Die Change: | +1 Perception | |||
| Examples: | The Punisher (Marvel), Rambo, Vasquez (Aliens) | |||
| The Healer | 28 pts | |||
|---|---|---|---|---|
| Passive: | Aura of Restoration | Friendly models within 3” recover 1 health point at the start of the Healer’s activation. | ||
| Active: | 4 |
Revitalise | Instantly revive an unconscious ally in base contact with half their health points. May Move first. | |
| Active: | 3 |
Calming Presence | Reduces the Adrenaline levels of all friendly models within 3" by 1. May Move first | |
| Die Change: | +1 Knowledge | |||
| Examples: | Katara (Last Airbender), Florence Nightingale, Asclepius | |||
| The Hunter | 24 pts | |||
|---|---|---|---|---|
| Passive: | Camouflage | When in base contact with terrain, the Hunter is invisible to any model beyond 6" and cannot be targeted. | ||
| Active: | 3 |
Hunter's Mark | Mark an enemy. All Shoot actions against this enemy by members of the Hunter's team have their Shoot damage increased by one step for the duration of the game. May Move first | |
| Active: | 3 |
Trap Mastery | Set a trap that causes Severe damage to enemy models within 3". May Move first. | |
| Die Change: | +1 Perception | |||
| Examples: | Daryl Dixon (The Walking Dead), Geralt of Rivia (The Witcher), Din Djarin (The Mandalorian) | |||
| The Marksman | 30 pts | |||
|---|---|---|---|---|
| Passive: | Eagle Eye | Ranged weapons used by the Marksman upgrade their range one step. | ||
| Active: | 4 |
Precise Shot | Damage from one ranged weapon is upgraded one step for this Shoot action. | |
| Active: | 4 |
Disarming Shot | If this Shoot Action is successful, the target cannot use their weapons during their next activation. | |
| Die Change: | +1 Perception | |||
| Examples: | Hawkeye (Marvel), Legolas (Lord of the Rings), John Wick | |||
| The Martial Artist | 32 pts | |||
|---|---|---|---|---|
| Passive: | Counterstrike | Once per turn this model can perform a free Fight Action against an enemy that attacked the Martial Artist in melee. | ||
| Active: | 4 |
Blinding Speed | Perform two Fight actions in a single turn. | |
| Active: | 5 |
Zen Focus | All odd results on the die roll for this Fight Action are considered Perfect Rolls. | |
| Die Change: | +1 Vitality | |||
| Examples: | Daredevil (Marvel), Ryu (Street Fighter), Ip Man | |||
| The Mentor | 28 pts | |||
|---|---|---|---|---|
| Passive: | Guiding Spirit | Friendly models within 3" upgrade their Knowledge by one step. | ||
| Active: | 4 |
Shared Wisdom | Grant an immediate free activation to an ally within 3”.May Move first. | |
| Active: | 3 |
Inspire | One friendly model within 3" has Advantage on its next Action roll. May Move first. | |
| Die Change: | +1 Knowledge | |||
| Examples: | Obi Wan Kenobi (Star Wars), Gandalf (Lord of the Rings), Professor X (Marvel) | |||
| The Mercenary | 28 pts | |||
|---|---|---|---|---|
| Passive: | Professionalism | The first damage received in a turn is downgraded one step (e.g. Severe to Average, Light to none, etc.) | ||
| Active: | 5 |
Ruthless Assault | Perform two Shoot and/or Fight actions in one turn (e.g. 2 Shoot, 2 Fight or one of each). | |
| Active: | 3 |
Suppressive Fire | Enemy models halve their next Move after being wounded by this Shoot action. | |
| Die Change: | +1 Power | |||
| Examples: | Boba Fett (Star Wars), Deadpool (Marvel), Roland Deschain (The Dark Tower) | |||
| The Outlaw | 22 pts | |||
|---|---|---|---|---|
| Passive: | Rogue's Luck | Friendly models within 3” may reroll one die per turn. | ||
| Active: | 3 |
Left Hook | This Fight action has Advantage and causes Bleed. | |
| Active: | 2 |
Slippery | Disengage from combat without needing a Fight Action. | |
| Die Change: | +1 Vitality | |||
| Examples: | Han Solo (Star Wars), Arthur Morgan (Red Dead Redemption 2), Robin Hood | |||
| The Rebel | 24 pts | |||
|---|---|---|---|---|
| Passive: | Inspire Rebellion | All friendly models within 3" gain 1 Adrenaline when the Rebel successfully Fights or Shoots an enemy model. | ||
| Active: | 2 |
Defiant Shout | All friendly models within 3" have Advantage on their Charisma until the end of the turn. May Move first. | |
| Active: | 4 |
Ambush | Fight action that deals Critical damage to target enemy model that has no Line of Sight to the Rebel at the start of the Rebel's activation. | |
| Die Change: | +1 Charisma | |||
| Examples: | V (V for Vendetta), Katniss Everdeen (The Hunger Games), Sarah Connor (The Terminator) | |||
| The Shadow | 24 pts | |||
|---|---|---|---|---|
| Passive: | Ghost's Veil | Cannot be targeted by attacks or abilities from more than 6” away. | ||
| Active: | 2 |
Smoke Veil | Create a smoke area (3"radius, centered on the Shadow) that blocks line of sight. May Move first | |
| Active: | 4 |
Backstab | Fight action that deals Critical damage to enemy model that has no Line of Sight to the Shadow at the start of the Shadow's activation. | |
| Die Change: | +1 Perception | |||
| Examples: | Ezio Auditore (Assassin's Creed), Batman (DC), Agent 47 (The Hitman) | |||
| The Spy | 30 pts | |||
|---|---|---|---|---|
| Passive: | Stealthy Approach | Cannot be targeted by Shoot actions from beyond Short range. | ||
| Active: | 4 |
Sabotage | Disable the weapon, armour or piece of equipment of an enemy within 3" for one turn. May Move first. | |
| Active: | 5 |
False Orders | Control an enemy model within 3" in its next activation. May Move first. | |
| Die Change: | +1 Agility | |||
| Examples: | Black Widow (Marvel), Ethan Hunt (Mission Impossible), Sydney Bristow (Alias) | |||
| The Tactician | 26 pts | |||
|---|---|---|---|---|
| Passive: | Master Planner | Initiative Rolls can be re-rolled. | ||
| Active: | 3 |
Flanking Manoeuver | Allows an ally within 3" to immediately perform a Fight Action. May Move first. | |
| Active: | 3 |
Counter Measure | Target enemy model within 6" cannot use Active Abilities in its next activation. May Move first. | |
| Die Change: | +1 Knowledge | |||
| Examples: | Thrawn (Star Wars), Tywin Lannister (Game of Thrones), Ender Wiggin (Ender's Game) | |||
| The Trickster | 24 pts | |||
|---|---|---|---|---|
| Passive: | Illusive | Enemies targeting the Trickster with direct attacks must first pass a Perception roll-off against the Trickster's Agility. | ||
| Active: | 3 |
Confusion | Cause one enemy within 6” to attack another random enemy within its range. May Move first. | |
| Active: | 3 |
Trickery | Swap places with another friendly model within 3". May Move first. | |
| Die Change: | +1 Charisma | |||
| Examples: | Loki, Jesse Pinkman (Breaking Bad), Jack Sparrow (Pirates of the Caribbean) | |||
| The Vanguard | 30 pts | |||
|---|---|---|---|---|
| Passive: | Bulwark | Friendly models within 3" have their Vitality die increased by one step during enemy attacks. | ||
| Active: | 4 |
Blitz Attack | Perform two Fight actions in a single turn. | |
| Active: | 4 |
Taunt | Enemies within 6" must perform a Fight action against this model on their next activation. May Move first. | |
| Die Change: | +1 Vitality | |||
| Examples: | Leonidas (300), Captain America (Marvel), Master Chief (Halo) | |||
| The Warrior | 30 pts | |||
|---|---|---|---|---|
| Passive: | Battle-Hardened | All damage received by the Warrior is downgraded one step (e.g. Critical becomes Severe, etc.). | ||
| Active: | 4 |
Whirlwind Slash | Perfom one Fight action against all enemy models within reach. The Warrior only rolls once and uses that result against every enemy. | |
| Active: | 4 |
Mighty Leap | Instantly Move to any location within 6", regardless of terrain and perform a Fight action. | |
| Die Change: | +1 Power | |||
| Examples: | Achilles, Kratos (God of War), Wonder Woman (DC) | |||
The Quartermaster
See below for an overview of all available Arms and Equipment (at this point).- Cost: The points it costs to equip a model with this item.
- Range: The range at which this item is effective. For more on ranges, see above.
- Damage: The damage done when this weapon causes wounds.For more on Health, see above.
- 1H/2H: Indicates whether one (1H) or two (2H) hands are needed to use this item effectively.
- Speed: The number of attacks that can be made with this weapon in a single Shoot or Fight action.
- Special Rules: Any Special Rules that apply.
| Item | Range | Damage | Special Rules | |||
|---|---|---|---|---|---|---|
| Throwing Knives/Stars/Shuriken | Short | Light | - | |||
| Sling | Medium | Light | - | |||
| Bow | Medium | Average | - | |||
| Crossbow | Long | Severe | Unwieldy | |||
| Handgun | Short | Average | - | |||
| Rifle | Long | Severe | - | |||
| Shotgun | Short | Severe | Spread | |||
| Assault Rifle | Long | Average | - | |||
| One-Handed Sword/Axe/Club | Melee | Average | - | |||
| Two-Handed Sword/Axe | Melee | Severe | - | |||
| Spear | Melee | Light/Average | Reach | |||
| Halberd | Melee | Severe | Reach | |||
| Dagger | Melee | Light | - |
| Item | Special Rules | ||
|---|---|---|---|
| Helmet | Once per turn, the model can reroll their Agility or Vitality die when attacked | ||
| Light Armour | Reduces Light damage to no damage and downgrades Average damage to Light. Does not affect Severe or Critical damage. | ||
| Medium Armour | Reduces Light damage to no damage, Average damage to Light, and Severe damage to Average. Critical damage remains unaffected. | ||
| Heavy Armour | Negates Light and Average damage, downgrades Severe damage to Average, and Critical damage to Severe. Downgrades Agility Die one step | ||
| Shield | Add an additional dice roll in a Roll-Off against ranged attacks (pick the higher result). In melee, once per turn, the model can downgrade one incoming melee attack by one level (e.g., from Severe to Average). |
| Fire | After a successful attack, the target takes 1 damage at the start of their next three activations unless they take a Breathe action to extinguish the flames. |
| Poison | After being wounded, all statistics are donwgraded one step until cured. Cannot be lower than D4. This effect can stack. |
| Bleed | The model loses 1 health point at the beginning of their activation until healed. This effect can stack. |
| Stun | A stunned model cannot take actions on their next turn but can still be moved or affected by other effects. |
| Freeze | A frozen model has their movement halved and suffers Disadvantage on Agility rolls. |
| Blind | A blinded model suffers disadvantage on Perception rolls and cannot perform Shoot actions. |
| Slow | Movement is halved, and the model cannot Sprint. |
| Fear | For 2 turns, the model cannot move closer to the enemy that caused the Fear effect and must pass a Charisma roll to engage in combat with any enemy. |
| Spread | Hits all targets in 2” circle |
| Armour Piercing | Downgrades Armour one step (e.g. Heavy becomes Medium, etc.) |
| Reach | Fight action does not require base contact, but can be made from 1” away. |
| Unwieldy | This item cannot be used if the model has moved during its activation. |